


Introduction:
Coaches are the user interfaces for human services. There are two types of user interfaces for human services: dashboards and task completion. When a Coach is a dashboard user interface, users can run it as a stand-alone user interface at any time. The users access it through the Process Portal. When a Coach is a task completion user interface, it is part of the human service flow. At run time, when the flow enters the Coach, the user sees the user interface that is defined for that Coach. The user interface consists of HTML code is displayed in a web browser. The flow leaves the Coach when a boundary event occurs. A Coach can have multiple exit flows with each one associated with a different boundary event.
Coaches contain one or more Coach Views. The Coach Views provide the user interface elements and layout for the Coach. Each Coach View can contain one or more other Coach Views, which creates a parent-child relationship between these Coach Views. At run time, the parent Coach View is rendered as a <div></div> tag that contains a nested <div></div> tag for each child Coach View. Each Coach View can also have a binding to a business object, CSS code to control its visual layout, and JavaScript to define its behavior.
Coach Views are reusable so you can create a library of common user interfaces and behavior. You can combine these common user interfaces to rapidly develop new Coaches.
Overview:
We can create a Coach View in the process application or in a toolkit. In general, create highly reusable Coach Views in toolkits and more specialized Coach Views in process applications.
We cannot directly edit the definition of the Coach View from within the parent Coach or Coach View. Instead, you must open the Coach View definition first before you can change it. When you open a Coach View definition to edit it, you can see the following pages:
- The Overview page displays the Coach View name, information about the Coach View, the images used to represent the Coach View during design time, and how the Coach View is used. You can also tag your Coach View to make it easier to find in the library and on the palette.
- The Behavior page displays the scripts and CSS files used by the Coach View. The Behavior page is also, where you define event handler code. The Event handlers are the entry points for the code of the Coach View. While the Coach View might reference supporting JavaScript files, the event handlers contain the functions that the IBM® Business Process Manager framework calls.
- The Variables page displays the business data binding, configuration options (which includes Ajax services), and localization resources available to the Coach View or used by the Coach View.
- The Layout page displays the Coach Views and controls contained within the Coach View and their relative positions. The layout page also displays the palette, which contains items that you can add to the Coach View. These items consist of Coach Views, which are categorized using tags, advanced items, and variables.
Implementation:
The following steps required for implement the coach and coach views.
- Create HomePage Coach View template.
- Create LoginPage Coach View template.
- Create MainHS Human Service.
- Create Home Coach.
- Test the application.
Create HomePage Coach View Template:
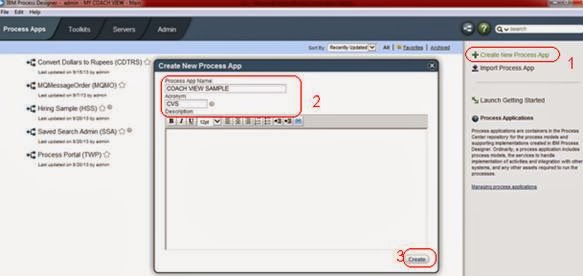
Open IBM Process Designer; Click on Create New Process App. Give the name as COACH VIEW SAMPLE, Acronym as CVS then click on finish.
Click on Open in Designer.
Step1:Upload the image for HomePage pallet.
Click the Add icon for Files and then select Web File.

Browse the HomePage.jpg image file as a web file then click on Finish

Step2:Create the HomePage Coach View:
Click the Add icon for User Interface and then select Coach View.

Give the new coach view name as ‘HomePage’ then click on finish.

Step3:Define the layout of the HomePage Coach View:
In the Layout page of the Coach View, drop a custom HTML item onto the layout canvas.
In the properties of the custom HTML item, add the following HTML code as text that goes in the header:
<div id="header">
<h1 id="header_text">Enterprise Application Integration by AMIR</h1>
</div>

This code defines the text that goes in the header division and opens the main content division.
Drop a content box below the custom HTML item for the content area. The content box is a placeholder for content that is defined by Coach Views and Coaches that users create based on the HomePage Coach View. In this case, content placed in the content box fits between the header and footer in the HomePage Coach View.
In the Layout page of the Coach View, drop a custom HTML item onto the layout canvas below the content box.
In the properties of the second custom HTML item, add the following HTML code as text that goes in the footer.
<div id="footer">
<h2 id="footer_text"> Copyright © All Rights Reserved. - EAI by AMIR </h2>
</div>
This code closes the content division and defines the text that goes in the footer division.
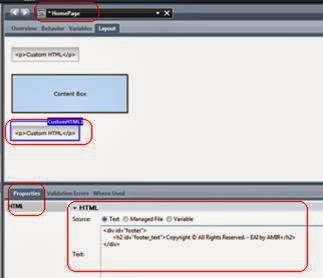
Step4:The layout of the HomePage View looks like the following screen capture:

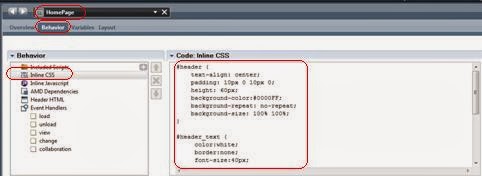
Step5:In the Behavior page, define the look of the HomePage View by adding the following code as inline CSS:
#header {
text-align: center;
padding: 10px 0 10px 0;
height: 60px;
background-color : #0000FF;
background-repeat: no-repeat;
background-size: 100% 100%;
}
#header_text {
color:white;
border:none;
font-size:40px;
}
#footer {
padding: 5px 25px 5px 5px;
text-align: center;
background-color : #0000FF;
background-repeat: no-repeat;
background-size: 100% 100%;
}
#footer_text {
color:white;
border:none;
font-size:12px;
}
Step6:Go to the Overview page select Use as a Template.
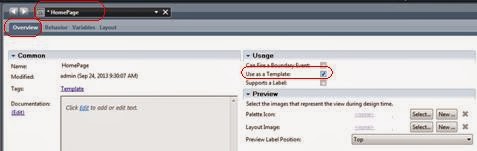
Step7:To represent the HomePage Coach View on the palette and in the New Coach View wizard, add a palette icon. Select the Image for Palette in Overview section.

Step8:Save the HomePage Coach View.
Create LoginPage Coach View Template:
- Click the Add icon for User Interface and then select Coach View. Give the new coach view name as ‘LoginPage’ then click on finish.
- Define the layout of the LoginPage Coach View:
- In the Layout page of the Coach View, drop a Vertical Section item onto the layout canvas rename as Login.
- Drag and drop a custom HTML and Content Box items inside Vertical section, in the properties of the custom HTML item, add the following HTML code as text that shows for username and password text boxes.
<p><input type=”email” name=”email” placeholder=”Email Address”></p>
<p><input type=”password” name=”password” placeholder=”Password”></p>

- Select the login vertical section Item go to Properties à Configuration and select the Show Boarder check box.

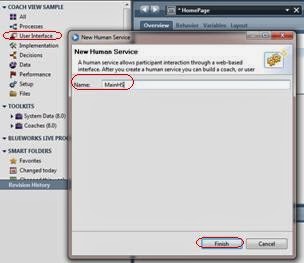
Create MainHS Human Service:
Click on + symbol near User Interface, select Human Service give name as MainHS then click on finish.
Create Home Coach
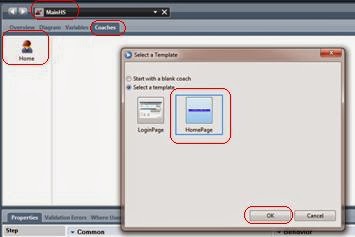
In MainHS click on diagram, drag and drop a coach item and rename it as Home.

In MainHS select Coaches click on Home Coach, it will open a new window to select a template. Select the HomePage as template and click on OK.
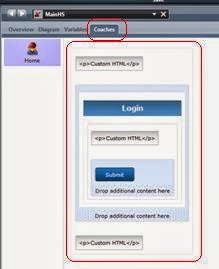
Now the home coach will be look like below.

Drag and drop LoginPage template and Button items inside Content box of the coach. Rename the button as Submit.
Now select the diagram in MainHS wire from start to Home coach and Home coach to End. Submit button will automatically populate between home coach and End.

Test the application:
Now our application builded successfully, we need to test the application.
Click on Run button at right corner of MainHS human service.

The result will be displaying on default web browser of our system as shown below.

This page developed using coach Home and Coach view HomePage, LoginPage.
Conclusion:
In this article, we learnt how to implement Coach, coach views and Human service. Here are we developed coach views using predefined activities and custom html code. The integration of Human service, coach and coach view are essential for implement BPM application.
Download:
File Name | Description | Size | Download |
COACH_VIEW_SAMPLE_v1.0.twx | Sample Coach implementation | 834 KB | |
Coach & Coach Views.pdf | Developing Coach & Coach View in BPM | 740 KB |