


Introduction
This article focuses on the XML aspects of business objects in WebSphere Process Server. It explains how a business object is defined, how to create and validate a business object. IBM customers require that business object (BO) instances are validated in runtime from the defined XSD (XML schema definition) constraints. This validation is desired by specific business systems to ensure data consistency and accuracy. Since version 6.1, WebSphere Process Server has provided BO instance validation support in runtime. This function confirms that the data passed into an operation matches the XSD types and constraints of the operation's inputs.
Overview
There are two ways to validate BO instances:
Ø Utilize the data validation qualifier
Ø Invoke the BO Instance Validator APIs
This article focuses on business objects validation in WebSphere Process Server. It demonstrates how to create business objects with constraints and how to validate business object instances in the runtime from the defined constraints.
Business Objects are SOA core components and it provides an abstraction layer for data objects. Business Object Framework is intended to provide data abstraction for service component. Component interfaces use Business Objects as inputs and outputs.
Business objects are modeled using xml schemas (XSD).
At run time BO's are represented in memory as an SDO instance using commonj.sdo.DataObject
Business Objects are collection of elements with names and data types.
We have two types of business objects:
1. Simple business object composed of scalars
2. Hierarchical business objects with elements that contain other business objects.
Business object compare utility shows the structure of business objects in two different modules or libraries and allows you to visually determine additions, removals, and changes. Also the "Copy Report to Clipboard" option allows you to paste changes into a document or other report.
Implementation
We will learn the following things in this article.
Ø Defining Business Objects.
Ø View Business Objects in XML.
Ø Add attribute in Business Object.
Ø Defining business objects with constraints.
Defining Business Objects:
We start by examining the sample module containing two simple business objects and one complex business object.
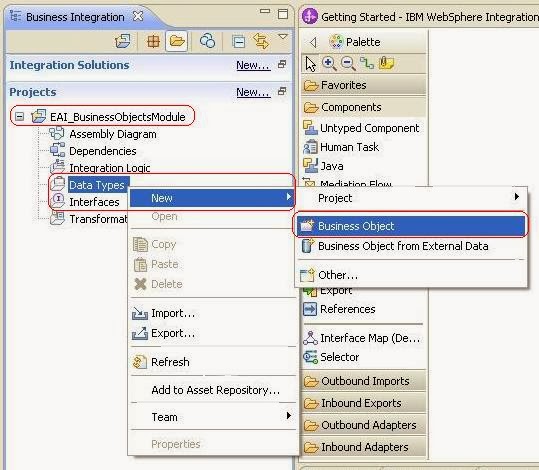
Create a module called ‘EAI_BusinessObjectsModule’.
Right click on EAI_BusinessObjectsModule àNew àBusiness Object.
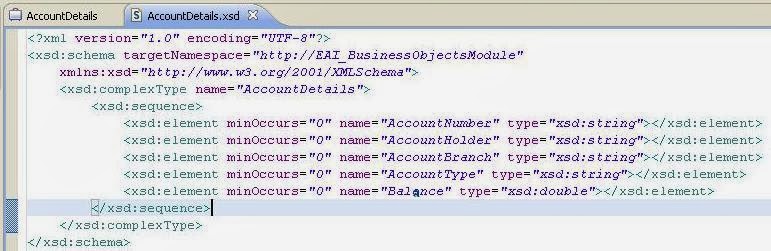
Give name as ‘AccountDetails’and click on finish. Add the fields to business object by clicking on add fields to business object. The AccountDetails business object is look like below.

Similarly create a business object called Address.

Now we will learn how to create a complex business object. The business object which contain other business object as a data type called as complex business object.
Create a business object called ‘Customer’ with one of the field name ‘Address’. Click on browse button near data types.

Select the Address business object which we have created previously. The complex business object ‘Customer’ looks like below.

View Business Objects in XML
Right click on AccountDetails à Open with à XML Schema Editor
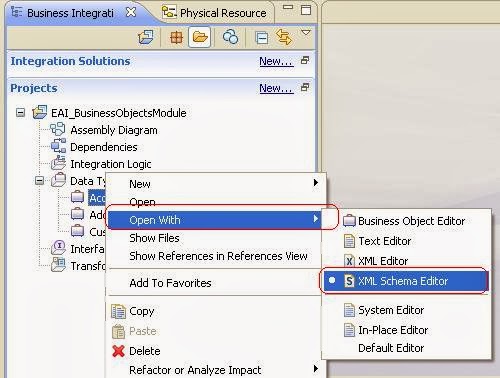
See the below screen shot, it will show the business object in XML schema with all fields and type.
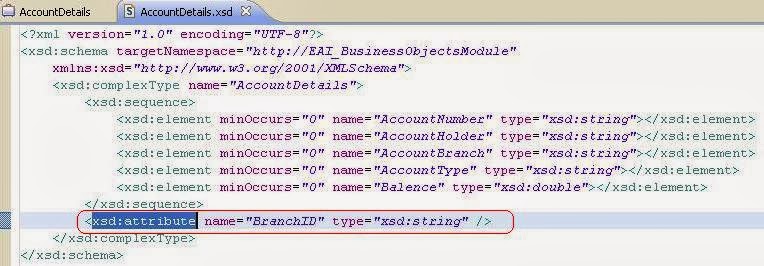
Add attribute in Business Object
Open business object in XML schema editor and add the following code into xml file.
<xsd:attribute name="BranchID" type="xsd:string" />
When we open business object in business object editor, it will look like below.

Defining business objects with constraints
We can define a constraint values for a field in business object. So it will allow only those type of constraint will allow during runtime. For example, if we want allow Account type only with Saving Account or Current Account. We can define these two constraints to Account Type field in a business object.
Defining the Enumeration constraint
Open ‘AccountDetails’ business object then select ‘Account Type’ field à Properties à Description.
Select ‘Only permit certain values’ check box and select ‘enumerations’ button. Click on add give the constrain value ‘Saving Account’ and click on Ok.

Repeat the same steps for adding two more constrains for the account type. Finally AccountDetails business object will be look like below.

Defining the Pattern constraint
Open ‘Customer’ business object then select ‘Phone’ field à Properties à Description.
Select ‘Only permit certain values’ check box and select ‘Patterns’ button. Click on add give the pattern value range 10 to 13 and click on Ok.

Conclusion
In this article, we learned how business objects are defined and the best practices to follow. We learned how to use WebSphere Integration Developer to create and validate XML documents prior to sending them to WebSphere Process Server. We can invoke this service for either implicit interface qualifier-based validation, or for validating business objects in WebSphere Process explicit programmatic validation. We learned how business objects with constraints are defined and how business object instances are validated. By following these recommendations, we will have a stable, flexible, and reusable library of types for your solution.
Downloads
File Name | Description | Size | Download |
Business Object Sample.zip | Business Object Sample | 11 KB | |
Business Objects in WPS.pdf | Business Objects in WPS Document | 750 KB |


