


Introduction
Here is our custom mediation primitive to be look like after development.


The WebSphere Integration Developer mediation flow editor comes with a set of pre-packaged mediation primitives. We can develop our own mediation primitives for support our business requirement. This article shows you how to develop our custom mediation primitives, which sit on the mediation flow editor palette along with the pre-packaged primitives.
We should have basic knowledge related to WebSphere Integration Develop & IBM® WebSphere® Enterprise Service Bus. Mediation primitives, whether prepackaged or created by you, are Eclipse plug-ins. This article teach you in general terms how to implement plugin , then test a specific sample -- a mediation primitive that Logs the Service Message Object (SMO) or some part of it to the console. When you complete this tutorial, your new SMOLoggerprimitive will appear on the mediation flow editor palette along with the pre-packaged primitives.
Overview
Before develop our custom mediation primitive, we need to think at reasons for develop custom mediation primitive and cost-benefit analysis, because designing the primitive and writing the Java™ code will take some time. Here are some possible reasons for building your own mediation primitive:
- All predefined mediation primitives don’t do everything we want.
- We can reuse our custom mediation primitive implementation.
- We can define our own properties.
- We can set of terminals different from the standard set.
- We can save time by using user-defined mediation primitives.
Here is our custom mediation primitive to be look like after development.
Implementation
The following steps are required to complete our custom mediation plug in development.
1. Implement the plug-in project.
2. Build the Java project.
3. Deploy the plug-in project, which is an Eclipse plug-in and must be deployed as one.
4. Deploy the Java project.
5. Build and Test the new mediation primitive.
Implement the plug-in project:
To implement the plug-in, use the Plug-in Development Environment that comes with WebSphere Integration Developer:
Select Window => Open Perspective => Other. In the Select Perspective popup window, check Show All, select Plug-in Development, and click OK.
In the confirmation pop-up window, click OK.
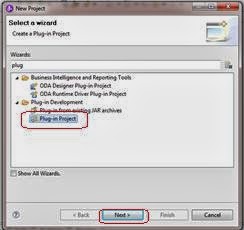
Select File => New => Plug-in Project.
In the New Plug-in Project popup window:
Set the Project Name to com.eai.wesb.SMOLogger. The Eclipse convention is to give plug-ins Java-package-like names. Under Project Settings, uncheck Create a Java project. We want our Java project to be separate from the GUI project. Then click on next.
Set the Project Name to com.eai.wesb.SMOLogger. The Eclipse convention is to give plug-ins Java-package-like names. Under Project Settings, uncheck Create a Java project. We want our Java project to be separate from the GUI project. Then click on next.
Click Finish.
Now we can see the plug-in manifest editor, which lets you configure the plug-in project. We need to edit the file plugin.xml. We have to configure two extensions: the handler extension, which provides the details about the primitive; and the UI contribution extension, which holds the icons for the primitive.
In the plug-in manifest editor, select the Extensions Click on Add. Then in the New Extension popup window:
Near the bottom, uncheck Show only extension points from the required plug-ins. The Mediation Flow editor plug-ins is not required, so you won't see them unless you uncheck this option.
Select com.ibm.wbit.sib.mediation.primitives.registry.mediationPrimitiveHandlers then click on finish.
Back in the plug-in manifest editor, right click on com.ibm.wbit.sib.mediation.primitives.registry.mediationPrimitiveHandlers and select New => mediationPrimitiveHandler.
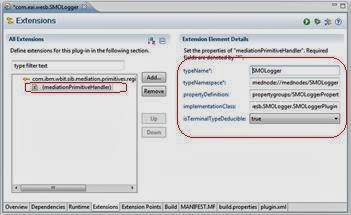
Make sure that the mediation primitive handler that you just created is selected, and fill in the Extension Element Details on the right with the following values:
typeName: SMOLogger
typeNamespace: mednode://mednodes/SMOLogger.mednode. propertyDefinition: propertygroups/SMOLoggerPropertyGroup.xml. We will place this xml file later.
implementationClass: com.eai.wesb.SMOLogger.SMOLoggerPlugin. This is the implementation for our mediation primitive plug-in.
isTerminalTypeDeducible: true. This means that when you define an interface for one of the terminals, all of the terminals on our mediation primitive will get the same interface. If you do not specify true then the user would have to explicitly define each terminal's interface.Now we will describe the mediation primitive. There are two descriptions: the short descriptionappears when we hover over the icon on the mediation flow editor palette, and at the top of the properties panel. The long description does not appear in the mediation flow editor.
Right click on (mediationPrimitiveHandler) and select New => shortDescription.
At the bottom of the editor, open Body Text and type in a short description of the mediation plug-in, such as SMO Logger, and then click on Apply.
Provide a long description of the plug-in:
Right click on (mediationPrimitiveHandler) and select New => longDescription. At the bottom of the editor, open Body Text and type in a long description of the mediation plug-in: Log to the console some or all of the SMO, depending on the XPath that the user specified and then Apply.
Now we have to describe the general plug-in details, such as each terminal. A mediation primitive has three types of terminals: input, output, and fail. We can only have 0 or 1 fail terminals, but you can have 0 or more input and output terminals. Each terminal has a name.
A terminal may be dynamic, meaning that there is no fixed number of that variety. We simply describe a single terminal of that variety and set the isDynamic flag to true. The SMOLogger example has a fixed set of terminals -- the typical set of one input, one output, and one fail terminal.
Describe the input terminal:
Right click on (mediationPrimitiveHandler) and select New => terminalCategory.
Fill in the Extension Element Details on the right with the following values:
o type: input
o name: in
o isDynamic: (leave blank)
Describe the output terminal:
Right click on (mediationPrimitiveHandler) and select New => terminalCategory.
Fill in the Extension Element Details on the right with the following values:
o type: output
o name: out
o isDynamic: (leave blank)
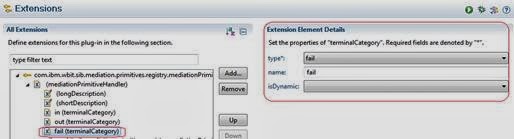
Describe the fail terminal:
Right click on (mediationPrimitiveHandler) and select New => terminalCategory.
Fill in the Extension Element Details on the right with the following values:
o type: fail
o name: fail (The name of the fail terminal is required to be fail).
o isDynamic: (leave blank)
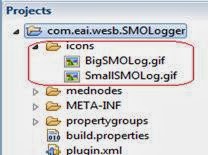
Now we will add the UI contribution extension, which describes the icons for the primitive. We need two icons that should be the same picture, but in different sizes. The large icon (32 x 32 pixels) appears on the mediation flow editor palette, and the small icon (16 x 6 pixels) appears on each primitive in the workspace.
Crete a folder called icons at project package explorer. Right click on com.eai.wesb.SMOLogger select Folder give the name as icons then click on Ok. Copy the two icons which are supplied in the sample file and paste it in icons folder.
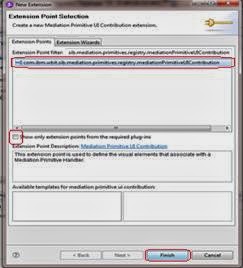
Back to plugin.xml, in the plug-in manifest editor, select the Extensions Click on Add. Then in the New Extension popup window:
Near the bottom, uncheck Show only extension points from the required plug-ins. The Mediation Flow editor plug-ins is not required, so you won't see them unless you uncheck this option.
Select com.ibm.wbit.sib.mediation.primitives.registry.mediationPrimitiveUIContribution then click on finish.
 Right-click on com.ibm.wbit.sib.mediation.primitives.registry.mediationPrimitiveUIContribution and select New => mediationPrimitiveUIContribution.
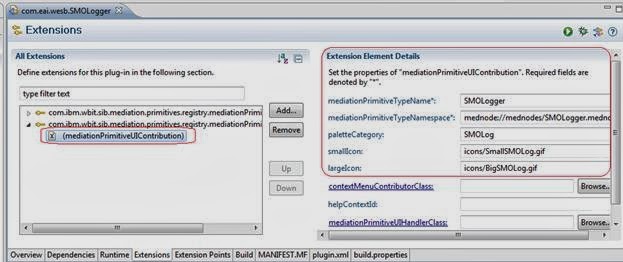
Select the mediation primitive UI contribution that you just created and fill in the Extension Element Details on the right with the following values:
mediationPrimitiveTypeName: SMOLogger
mediationPrimitiveTypeNamespace: mednode://mednodes/SMOLogger.mednode.
paletteCategory: SMOLog
smallIcon: icons/SmallSMOLog.gif
largeIcon: icons/BigSMOLog.gif.
Save the contents of the plug-in manifest editor.
The propertygroups folder:
In the Package Explorer on the left side of WebSphere Integration Developer, right-click on our plug-in project com.eai.wesb.SMOLoggerand select New => Folder.
For Folder Name, type propertygroups and click Finish.
Copy SMOLoggerPropertyGroup.xml and paste into the propertygroups folder.
The SMOLoggerPropertyGroup.xml has the following content.
<pg:BasePropertyGroups
name="CacheReaderPropertyGroups"
resourceBundle="ESBMediationExamples"
xmlns:xsi="http://www.w3.org/2001/XMLSchema-instance"
xmlns:pg="http://www.ibm.com/propertygroup/6.0.1">
<propertyGroup
name=" SMOLoggerPropertyGroup"
xsi:type="pg:BasePropertyGroup" >
<property
name="XPath"
displayName="Log the SMO at this XPath"
defaultValue="/body"
required="true"
propertyType="String"
id="com.ibm.propertygroup.ext.ui.XPathProperty"
xsi:type="pg:ConstraintSingleValuedProperty">
<description>
An XPath expression to the SMO which will be Logged to the console.
</description>
</property>
</propertyGroup>
</pg:BasePropertyGroups>
The mednode file is the mediation meta-data file. It is a generated file, and is generated with the following steps:
1. In Plugin.xml file right side click on Launch an Eclipse application green button.
2. WebSphere Integration Developer launches a new IDE, which takes a few minutes.
3. Once the new IDE launches, select Window => Show view => Other => Mediation Development => Mediation Metadata Generation. Then click on Ok
4. The mediation primitive that you created is displayed in the Mediation Metadata Generation view of this new IDE. Check the SMOLogger row. Click Generate.
5. The status of your mediation primitive should now be OK. The tool has just generated the meta-data mednode file.

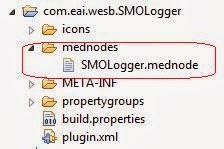
6. Close this IDE. Back in the main WebSphere Integration Developer window, in the Package Explorer view, right-click on your mediation primitive plug-in project and select Refresh. You should now see a mednodes folder that contains the file SMOLogger.mednode
Now that we have created and populated the necessary folders, you have to make sure that they are included when the plug-in project is built:
1. Go back to the plug-in manifest editor, in which you were editing the plugin.xml file.
2. Select the Build tab.
3. Ensure that the following items are all checked under Binary Build (as shown in the figure):
o The icons folder
o The mednodes folder
o The plugin.xml file
o The propertygroups folder
Save the contents of the plug-in manifest editor. We are done building the plug-in project and you have completed this section. The next section shows we need to build the Java project.
Build Java project:
Here we are going to develop implementation for our plug-in. Here we are going to develop a class to handle our custom mediation plugin.
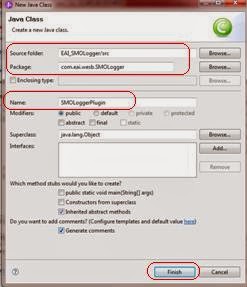
Create a Java project called as ‘EAI_SMOLogger’ and create a Java class called ‘SMOLoggerPlugin.
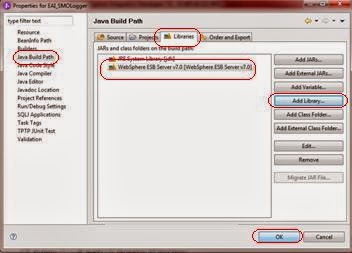
Right click on ‘EAI_SMOLogger’ select properties à select Java build path à click on Add Library. Add the WebSphere ESB server v7.0. Then click on OK.
Add the following code into SMOLoggerPlugin class.
package com.eai.wesb.SMOLogger;
import java.io.ByteArrayOutputStream;
import com.ibm.websphere.bo.BOXMLSerializer;
import com.ibm.websphere.sca.ServiceManager;
import com.ibm.wsspi.sibx.mediation.InputTerminal;
import com.ibm.wsspi.sibx.mediation.MediationBusinessException;
import com.ibm.wsspi.sibx.mediation.MediationConfigurationException;
import com.ibm.wsspi.sibx.mediation.OutputTerminal;
import com.ibm.wsspi.sibx.mediation.esb.ESBMediationPrimitive;
import commonj.sdo.DataObject;
/**
* @author AMEER BASHA G
*
*/
public class SMOLoggerPlugin extends ESBMediationPrimitive{
private static final String OUTPUT_TERMINAL_NAME = "out";
private String xPath;
public String getXPath() {
return xPath;
}
public void setXPath(String xPath) {
this.xPath = xPath;
}
public void mediate(InputTerminal inputTerminal, DataObject message)
throws MediationConfigurationException, MediationBusinessException {
try {
BOXMLSerializer serializer = (BOXMLSerializer) ServiceManager.INSTANCE.locateService(
"com/ibm/websphere/bo/BOXMLSerializer");
ByteArrayOutputStream baos = new ByteArrayOutputStream();
serializer.writeDataObject(message.getDataObject(
getXPath()),
"urn:someNamespace",
"log",
baos);
System.out.println(new String(baos.toByteArray()));
// Get the out terminal from the mediation services
OutputTerminal outTerminal = getMediationServices().getOutputTerminal(
OUTPUT_TERMINAL_NAME);
if (outTerminal != null) {
// Fire the message to the out terminal
outTerminal.fire(message);
}
}catch (Throwable t) {
System.out.println("Problem calling SMOLogging. Not Logginging anything.");
t.printStackTrace();
}
}
}
Since it is the implementation for mediation primitive plug-in, the project needs the GUI metadata file for that primitive:
1. In the Package Explorer view, right-click on com.eai.wesb.SMOLogger => mednodes => SMOLogger.mednode and select Copy.
2. Right-click on the EAI_SMOLoggerproject and select Paste.
We have developed our plugin and implementation java project. You are now ready to deploy your two projects.
Deploy the plugin Project:
Here we are going to develop implementation for our plug-in. Here we are going to develop a class to handle our custom mediation plugin.
The code for the implementation itself has to be made available to the runtime. The steps below will install this code as a JAR file to the WebSphere Integration Developer test server runtime. If you also want to run this primitive in a standalone WebSphere ESB or WebSphere Process Server runtime, copy this JAR file to that installation's $WAS_HOME\lib\ext directory as well.
1. Right-click on the Java project EAI_SMOLogger and select Export.
2. In the Select panel, select JAR file.
3. Click Next.
4. In the JAR package specification panel:
o JAR file: $WID_HOME\runtimes\bi_v6\lib\ext\SMOLogger.jar
o Leave the remaining fields with their default values.
5. Click Finish.
We have just deployed the implementation for the plug-in. We must restart our server in order for it to recognize this new JAR file.
Deploy the Java Project:
The plug-in project must be exported as an Eclipse plug-in, which reside in the $WID_HOME\wstools\eclipse directory.
1. Right-click on the mediation primitive plug-in project com.eai.wesb.SMOLoggerand select Export.
2. In the Select panel, select Deployable plug-ins and fragments and click Next.
3. In the Deployable plug-ins and fragments panel:
o Deploy as: a directory structure
o Directory: browse to $WID_HOME\wstools\eclipse
o Leave the remaining fields with their default values.
4. Click Finish.
We have deployed the plug-in project. The last thing we have to do before we can use your newly created primitive is to enable it in WebSphere Integration Developer. Since it is an Eclipse plug-in, we must restart WebSphere Integration Developer in clean mode, which means it reloads all of its plug-ins. If we have an icon on your desktop, follow these steps:
Shut down WebSphere Integration Developer and restart it with the -clean option:
1. Right-click on the WebSphere Integration Developer desktop icon and select Properties.
2. Add -clean to the Target field:
Double-click on the WebSphere Integration Developer icon to start it in clean mode. While it is starting, we can use the time to roll back what we just did. Remove -clean from the properties Target field. WID -clean is slower than a normal invocation of WebSphere Integration Developer, so you should only use it when instructed, such as when you create new mediation primitives.
Build and Test the new mediation primitive:
Create a mediation module called EAI_SMOLoggerTest. Create a Business Object and Interface as shown below view.
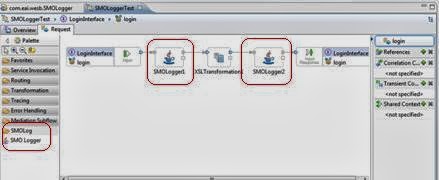
Create a Mediation flow called as SMOLoggerTest by using LoginInterface. The mediation flow will be look like below.
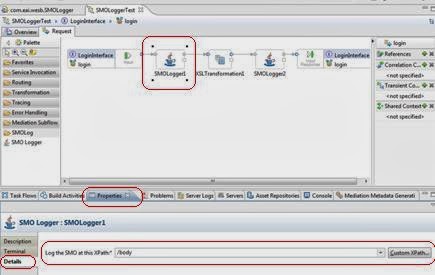
Select the SMOLogger1 primitive and click on properties à Details, browse the Xpath as shown below.
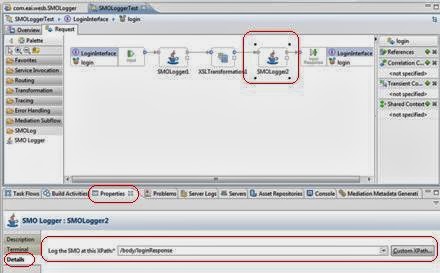
This is going to print the request body into the console. Select the SMOLogger2 primitive and click on properties à Details, browse the XPath as shown below.
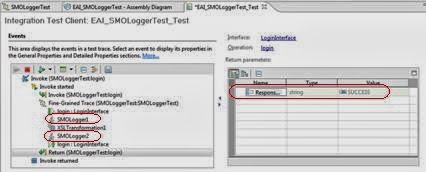
This is going to print the response into the console. Deploy the Mediation module into ESB server. Right click on SMOLogger mediation component on assembly diagram. Select test component, enter the user name and password field and click on continue.
This will trigger our mediation flow; it will print the SMO into the console. The mediation primitive also will shown on the successful flow.
Our main intention is log the SMO into the console. After we test the flow, SMO has been logged into the console.
Conclusion
Here we learned how to develop our custom mediation primitive. The custom mediation primitive will be useful when we need to reuse any functionality in our business projects.
Downloads
File Name | Description | Size | Download |
PrimitivePluginFiles.zip | Sample Code | 20 KB | |
Custom Mediation Plugin.pdf | Develop Custom mediation primitive using WID | 800 KB |


